Creating a GitHub App with Node.js
Recently GitHub have updated their policy regarding integration with 3rd-parties applications. Earlier we could use Personal Access Tokens or OAuth apps to automate our interactions with the platform. Now they have added a third option — GitHub Apps.

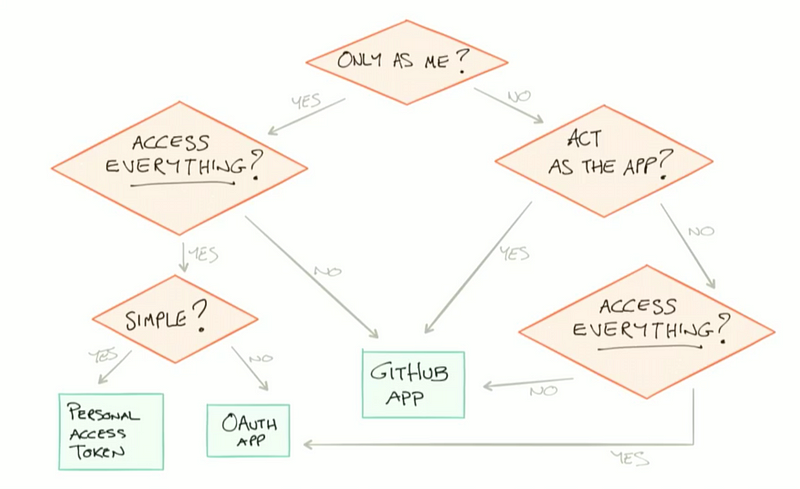
The main difference between OAuth Apps and GitHub Apps is that first act as an authorized user, who gave his credentials, while the latter act as a separate entity after installed to the organization or repository.
That might be a little confusing at first (as it was to me), so at GitHub they even have a flow-chart to decide what should you build. Generally, if you have a task which requires access to specific set of resources and also acts rather as an app (or bot, if you prefer), you can do pretty well with GitHub App.
They do have quite nice tutorials on GitHub regarding these innovations. But they only use Ruby and cover quite a small amount of topics. Although it’s not that hard to apply those tutorials to Node.js environment I prefer to have handy information for each tool I use.
Today we will go through a quite simple flow to better understand nature of GitHub Apps as well as create our own with Node.js.
Here is the task we are going to solve. Let’s say we have a repository with a JavaScript package which is used across our other projects. When we release a new version of the package we wan’t to update the version used across our whole organization.
There are several options how we can approach this task with GitHub Apps:
- Automated. On push to master (and possibly successful CI build) iterate over all the repositories which are mentioned in the “used by” section of our package repository’s metadata. For each of such repositories we then create a branch for the update. In that branch modify “package.json” file to match a new version of our package and the create a Pull Request to the repository’s default branch.
- Manual. If we do have reasonably small amount of projects dependent on our package what we can do is to have a list of all such repositories. When a new version of the package is released we can then go over them and update in the manner described for fully automated approach.
In this tutorial we will start with the “manual” way (which actually isn’t that manual, as it is ran by a separate script). When done with it we’ll update to fully automated search of the repositories which use our package and proposing them PRs with updates to a newer version.

Our mini-project consists of such parts:
- Create GitHub App on the GitHub Dashboard
- Install it to the repository where we will test our interactions
- Set up Node.js application for our project
- Get started with authorization flow as a GitHub App and a single installation instance
- Retrieve data from a remote repository
- Modify package.json with a new version of the package
- Create a new branch for our changes
- Commit single file to a remote branch
- Create Pull Request from branch we created to the default one
Seems like we have stuff to do today. Then, let’s start!

Create GitHub App on the GitHub Dashboard
Before actually going to GitHub we will need an address for the app’s webhook and “landing page”. You could either use your own cloud server (such as AWS, Digital Ocean or Heroku) or use a Smee.io. Smee.io is a service which receives payloads at address available on the web and then sends them to your locally running application. If you use Smee.io, for now just click “Start a new channel” and copy the link in “Webhook Proxy URL” field. We’ll need it later on this step.
Now you need to create a GitHub App in the “Developers settings” section of your GitHub settings page. Fill the name field with one you like, for example, “package.json update via Node.js” in my case. And then paste your webhook proxy URL (or actual URL of you server) into both “Homepage URL” and “ Webhook URL”.
Then, we need to set up permissions for our GitHub App. First of all, set “Repository contents” to Read & Write access, as well as for “Pull Requests”. That should be enough for our first iteration and it is always possible to update these settings later. Finally, select “Only on this account” for “Where can this GitHub App be installed?” question and hit Create button.
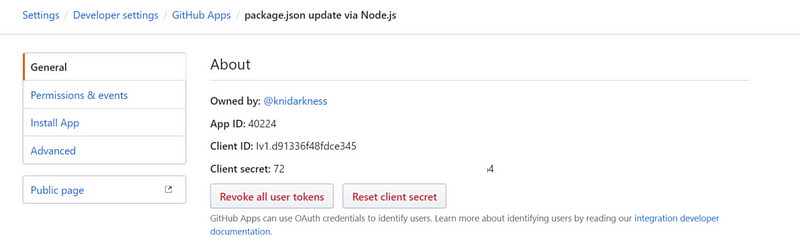
On the page of your app click “generate a private key” and save it to your project directory. We’ll use it later. Also, save App ID from the About section.
That’s it, we have created the GitHub App… at least, it is on GitHub now 😃
Install GitHub App into the repository
The next thing we should do is to give our new GitHub App access to one or several repositories we want it to be able to update. To do that, go to the public page of your app or click “Install App” in the app settings.
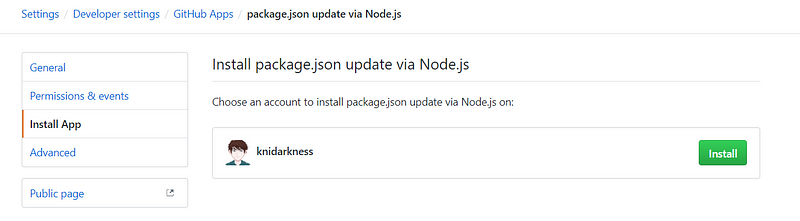
You will see a list of accounts and organizations you have admin access to. In my case, that’s only my GitHub account, so I will press “Install”. Then we can chose if we want to give access to all or just a few repositories. I will use the first option, as it might be useful for our automated phase.

When you click “Install” here, installation of your GitHub App is done. Now it has access to repositories in your account, can read & write them as well as manage pull requests. From now we can actually start developing our implementation for the functionality we mentioned in the beginning of the article.
Set up Node.js application for our project
You can use your favorite boilerplate template, tutorial, or create project from scratch. What we want from our Node.js app is following:
- Support ES6 syntax
- Have .env file with following data: GITHUB_APP_IDENTIFIER, PRIVATE_KEY, and GITHUB_WEBHOOK_SECRET if you used one.
In my project I have just used such initialization sequence:
npm install --save-dev @babel/core @babel/node @babel/cli @babel/preset-env eslint eslint-config-airbnb-base eslint-plugin-import babel-eslint eslint-plugin-babel
And created files .babelrc:
{
  "presets": [
    ["@babel/preset-env",
      {
        "targets": {
          "node": "current"
        }
      }
    ]
  ]
}
And .eslintrc.yml:
plugins:
  - babel
env:
  node: true
parser: babel-eslint
extends:
  - 'airbnb-base'
rules:
  no-console: 0
After that we can get to the first step of mastering GitHub App — authorizing as our application.
Implement authorization flow for GitHub App
There are two ways in which GitHub App can authorize:
- As an app. In such way it can get general information about the application itself.
- As a specific installation of an app. Remember, when you have installed the app into your account? That is it, each of such installation can be accessed separately.
In this mode GitHub App can actually use all permissions we have granted it during set up.
We need to start with authenticating as an app, as it is required for any further interaction with GitHub API. To authenticate as app we need to generate a JWT signed by app’s private key which we have saved previously. After that, we can use this JWT to acquire access tokens for separate installations.
We are using octokip/app package for this part. Besides, we are going to use octokit/rest which is an official REST API client for GitHub API. There is an extensive docs on the octocit/rest methods and usage on their GitHub Pages as well.
Let’s create a file ./src/package-updater/auth.js, which will handle this flow:
import { App } from '@octokit/app';
import fetch from 'node-fetch';
import dotenv from 'dotenv';

dotenv.config();

// Initialize GitHub App with id:private_key pair and generate JWT which is used for
// application level authorization
const app = new App({ id: process.env.GITHUB_APP_IDENTIFIER, privateKey: process.env.PRIVATE_KEY });
const jwt = app.getSignedJsonWebToken();

/**
 * This method will generate an installationAccessToken which we will further pass to create
 * installation level client for GitHub API.
 *
 * @param {string} owner A name of github account, repository with installation
 * belongs to. E.g. 'knidarkness'
 * @param {string} repo A name of a repository with GitHub App installed. E.g. 'github-app-nodejs'
 */
const getInstallationAccessToken = async (owner, repo) => {
  // Firstly, get the id of the installation based on the repository
  const result = await fetch(`https://api.github.com/repos/${owner}/${repo}/installation`,
    {
      headers: {
        authorization: `Bearer ${jwt}`,
        accept: 'application/vnd.github.machine-man-preview+json',
      },
    });

  const installationId = (await result.json()).id;

  // And acquire access token for that id
  const installationAccessToken = await app.getInstallationAccessToken({
    installationId,
  });

  return installationAccessToken;
};

export default getInstallationAccessToken;
And test if it is working correctly on one of the repositories into which we have installed our new GitHub App. For me it will be the project’s repository itself. Here’s our ./src/main.js:
import getInstallationAccessToken from './package-updater/auth';

getInstallationAccessToken('knidarkness', 'test-repo')
  .then((token) => console.log(token));
And we can run it with npm start. If you’ve done everything right, you`ll see something like following in you terminal output:
v1.f4ada6a4ad7132f12f4a92123fab66ad3a5f0dda
That’s it, installation access token which allows to work directly with our repository. Now let’s do something useful with it.
Read data from a remote repository
The first step to update package.json file in remote repository is to read it. So, why don’t we start implementing from this point. Octokit/rest will help us to do that.
First of all, we will need to create a REST client with installation level permissions. As we are going to use for all our API calls, let’s add following function to auth.js and update our exports:
const getInstallationClient = (installationAccessToken) => new Octokit({
  auth() {
    return `token ${installationAccessToken}`;
  },
});

export {
  getInstallationAccessToken,
  getInstallationClient,
};
Now we can try to read a file from a remote repository. For that purpose let’s create a getRemotePackageJSONObject function in ./src/package-updater/index.js :
import getInstallationClient from './auth';

const getRemotePackageJSONObject = async (owner, repo) => {
  const installationClinet = await getInstallationClient(owner, repo);
  const fileData = await installationClinet.repos.getContents({
    owner,
    repo,
    path: 'package.json',
  });
  const fileObject = JSON.parse(Buffer.from(fileData.data.content, 'base64').toString());
  return fileObject;
};

export {
  getRemotePackageJSONObject
};
And call this function from our main.js:
import { getRemotePackageJSONObject } from './package-updater';

const owner = 'knidarkness';
const repo = 'test-repo';

getRemotePackageJSONObject(owner, repo)
  .then((obj) => console.log(obj));
If everything is fine, you will see contents of the remote package.json in your console.
Modify the package.json object
Now we can start modifying the data and keep working to push it back to repository. However, let’s make a break and think about architecture of our app for a minute.
We will have a module named ‘package-updater’ with a single entry point called updateRemoteRepository, which will take three parameters:
- Name of the repository in format “owner/repo”
- Package name in package.json which is to be updated. For example, “express”
- New version of the package we are modifying
It will do all the machinery and return only result: True, if update was successful, or throw error otherwise.
For that purpose, let’s update our ./src/package-updater/index.js a bit and add these functions:
const splitRepositoryPath = (repo) => ({
  repositoryOwner: repo.split('/')[0],
  repositoryName: repo.split('/')[1],
});

const updateRemoteRepository = async (repo, packageName, newVersion) => {
  const { repositoryOwner, repositoryName } = splitRepositoryPath(repo);
  const packageJSONObject = await getRemotePackageJSONObject(repositoryOwner, repositoryName);
  return packageJSONObject;
};

export default updateRemoteRepository;
And also update main.js so that it would call our brand new god-like function:
import updateRemoteRepository from './package-updater';

const repo = 'knidarkness/test-repo';
const packageName = 'express';
const newVersion = '4.5.12';

updateRemoteRepository(repo, packageName, newVersion)
  .then((obj) => console.log(obj));
Wow, now we can return to what this section should be about.
Modify the package.json object (now for real)
This is actually the easiest part of our task. We can just use spread syntax and have all the work done in these few lines in ./src/package-updater/index.js:
const updatePackageJSONObject = (packageJSONObject, packageName, newVersion) => ({
  ...packageJSONObject,
  dependencies: {
    ...packageJSONObject.dependencies,
    [packageName]: newVersion,
  },
});
Now, when we have our data updated we need to push it back to the repository. And the first step to that goal is to…
Create a branch on the remote repository
We can’t commit our changes to master as it can possibly break existing solution. So, we’ll fix that by creating a new branch called “packageName-update-to-newVersion” each time we modify contents of package.json file.
We will create branch from the repository default branch as it highly likely has current release version.
And again we are going to use octokit/rest for this task.
Now, when we have a branch to commit our changes it’s time to…
Commit file to the created branch
Updating file is actually quite similar to creating a branch: we get a hashsum of the previous version of the file, specify the target branch and commit our new file encoded with base64.
const commitUpdatedObject = async (installationClient, repositoryOwner, repositoryName, remoteBranchName, updatePackageJSONObject) => {
  // We get a SHA sum of the file in target branch
  const { sha } = (await installationClient.repos.getContents({
    owner: repositoryOwner,
    repo: repositoryName,
    path: 'package.json',
    ref: remoteBranchName,
  })).data;

  // And commit our changes to that branch
  await installationClient.repos.createOrUpdateFile({
    owner: repositoryOwner,
    repo: repositoryName,
    path: 'package.json',
    branch: remoteBranchName,
    message: remoteBranchName,
    sha,
    // Note, that content goes in the base64 encoding which is an update for upstream in GitHub API
    content: Buffer.from(JSON.stringify(updatePackageJSONObject, null, 2)).toString('base64'),
  });
};
The code here is quite self-explanatory so we will proceed to the final steps in updating a single repository.
Create Pull Request for the branch with updates
When we have pulled initial package.json, updated its contents, created a branch and committed into it there is only one final step to show results to the world — create pull request and wait until it is approved.
With GitHub API you can create a PR with a single call to the endpoint
POST /repos/:owner/:repo/pulls
Which again will be handle for us by octokit/rest package. Just as in the web version we should provide head and base branches, title and optionally body of the pull request. One more argument which we pass will allow other maintainers to modify pull request as it might be needed to adopt a new version of the library.
const createPR = async (installationClient, owner, repo, newBranchName) => {
  // get the name of a default branch as it is not always a 'master'
  const { default_branch } = (await installationClient.repos.get({ owner, repo })).data;
  // and create PR to merge into it
  installationClient.pulls.create({
    owner,
    repo,
    title: `Merge ${newBranchName} as new version of package available`,
    head: newBranchName,
    base: default_branch,
    maintainer_can_modify: true,
  });
};
And that was the last piece we needed to finish this part of the app. Now we can update our updateRemoteRepository function so that it would use all our work:
const updateRemoteRepository = async (repo, packageName, newVersion) => {
  const { repositoryOwner, repositoryName } = splitRepositoryPath(repo);
  const installationClient = await getInstallationClient(repositoryOwner, repositoryName);

  const packageJSONObject = await getRemotePackageJSONObject(installationClient, repositoryOwner, repositoryName);
  const updatedPackageJSONObject = updatePackageJSONObject(packageJSONObject, packageName, newVersion);
  const remoteBranchName = await createRemoteBranch(installationClient, repositoryOwner, repositoryName, packageName, newVersion);
  await commitUpdatedObject(installationClient, repositoryOwner, repositoryName, remoteBranchName, updatedPackageJSONObject);
  await createPR(installationClient, repositoryOwner, repositoryName, remoteBranchName);
};
Now you can try to run the app with npm start and if you followed this tutorial in your repository which you pass as an argument in main.js a new PR should appear!
If you have some problems — you can check the full project in the GitHub repository by the following link:
knidarkness/github-app-nodejs And now we are coming to the bonus part.
Automate updating of dependency files when a new version is released
If you are using Smee.io it’s time to install its client and launch it to redirect requests to your local machine:
npm install --global smee-client
`smee -u LINK_TO_YOUR_SMEE_ENVIRONMENT`
After that, all requests made to your smee.io proxy will be redirected to the localhost.
Our plan is following:
- Filter events that belong to our “source repository”. We need only those which are push events to master branch.
- When triggering event happens we pull package name and a new version from the repository’s package.json
- And iterate over all installations of our app. For each repository which is not a one with our package we check if it has our target package in its dependencies and if so — update that repository just as we did in previous section
We will use Express to create our server so install it as npm install --save express.
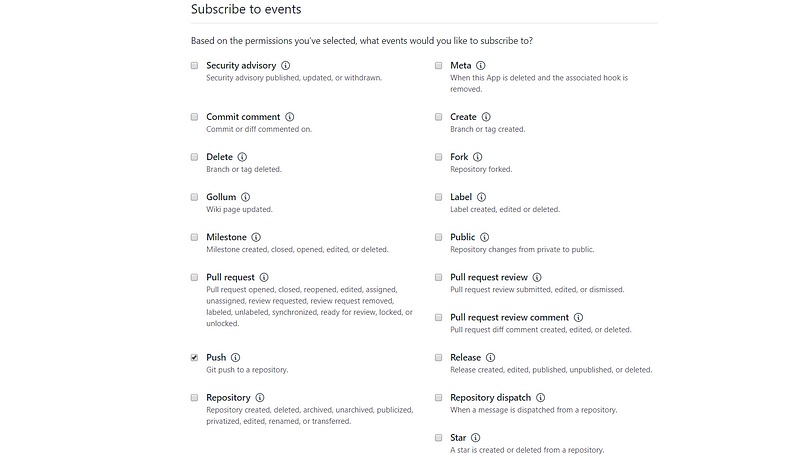
In this part we will touch working with webhooks. First step will be to enable notifications for Push events. To do that go to “Permissions & events” tab in your GitHub App settings and scroll to “Subscribe to events” section. There check “Push” checkbox and then save changes.
Now try to commit and push something to your repository connected to the GitHub App. After that go to the Smee.io page (or you server logs). You will see something like following (not important fields are replaced with ‘…’):
In received event we care about two fields: payload.ref and payload.repository.master_branch. If they are the same, then it is a push to master, so we should trigger out update.
There is one large drawback in our approach: as we use the same app both for the repository with package we want to track as well as for repositories which we want to update. For now, to distinguish the “source” repository we will simply store its name in our .env file.
So, let’s create Express middlewares to filter all the requests we get to our server. If you are new to Express, you can check briefly here.
And then we can create a final version of our main.js. Replace existing code with a single Express endpoint which listens to port 3000, filters events and calls function to update all repositories dependent on our package (which we will create a bit later).
The last part is to update our package-updater/index.js so that it could perform batch update. To do that we will add a couple new functions to it which will be wrapped into updateAllDependents.
Also, it’s noteworthy that we should update our updateRemoteRepository flow to check if target repository has package we are updating in its dependencies at all. Simple solution is to check package.json dependencies section and if target package is not there, just ignore the repo. Implement it by yourself or check my version here.
When done, create a repository with a JavaScript package which will be used as “source repository” now, and add this package name to dependencies of a few other repositories. Set “source repository” in the SOURCE_REPO variable in .env file. Install your application to these new repos and run server. Then, when you push to master of the package repository our newly written GitHub app will update dependencies inside other repositories.
Congratulations! We have gone from scratch to a working prototype of GitHub App with Node.js.
I hope this tutorial was useful for you and you`ll apply this info on your real projects. And one more link to the final project on GitHub: knidarkness/github-app-nodejs